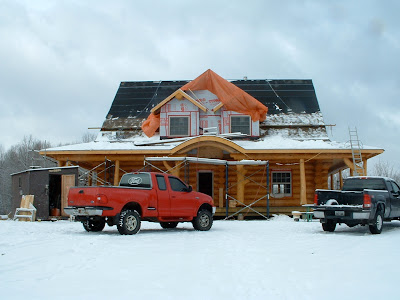
Full scribe Scandinavian style round log home construction project named Angara. This is the story of the building and finishing of a custom log home in Ontario, Canada.
Suppliers - services and materials
Tuesday, December 16, 2008
Warming up in the basement
Catherine taking a break to warm up. It got to -18C on December 12, which was a long day finishing the vapor barrier and then sweeping the snow out of the main floor. Next year we will smile about this as we watch the snow swirl around from inside the house with a nice cup of tea (or glog...).
Keeping the basement warm
The ICF foundation does a great job of keeping the basement warm. December 5 brings electricity to the house via hook up of the main panel in the basement, with some outlets and on December 12 also hook up of the power supply to the pump for the well. Since the phone was also hooked up this week, technically we have power, phone, running water and septic now available (roughed in at least). Thanks to Danny McIver for getting us power and making a heater and blower available. It is now hooked up to keep the basement from freezing. Bob is here showing where he put temporary insulation in the subfloor and is now installing vapor barrier - this is to keep things snug so that we do not freeze and heave that newly poured basement floor.
Snow everywhere
Finally the north and south sides are shingled!
Early December sees the shingling done on the north and south sides including gables. All that is left is the west and east side porch roof shingling, which we are leaving until spring because we need to stage off of these two sections of roof to install the east and west gable end siding and soffit. These two sides are fully protected with ice guard and they are good an watertight for now.
There is so much snow that you cannot actually see that the shingling is done, you will have to trust me on this..... Note that it looks sweet now with the windows and doors in place.
Sweeping and covering the roof to finish shingling
November 25 and it is a long cold walk to the outhouse
Winter is a little merciless this year. Catherine gazes out the window of the trailer and thinks warm in preparation for her next visit to the outhouse. It looks as though the snow is going to stay. This week we see temperatures down to -12 C and that made the propane furnace in the trailer work pretty hard. Bob kindly gets up in the night to switch propane tanks when we run out. Not the camp shower still hanging on the post but it is frozen now!
Jim installs the door hardware
Sausage roll in place
Bob holding a window/door sausage roll
You can see how bundled up Bob is - late November is cutting it close for getting windows and doors in for northern Ontario! Bob is holding one of the "sausage rolls" that we made out of 6 mil plastic vapor barrier, pink fiberglass insulation and Tuck tape. The bags are squared and loosely packed to allow for them being compressed in the opening at the top of each window and door in the log part of the house. These "sausages" allow for insulation, vapor barrier and an air seal while the house settles.
Window and door frames next
Here is a window frame set in between the two side spline assemblies. A space is left between the top of the squared frame and the window opening to allow for settling and vertical compression of the logs (will be 6% nominal). A piece of roll foam is set at the bottom of the frame and toed into the slot in the wall for a water and air tight fit.
Putting in the window and door splines
Ronn has come back to put the doors and windows in the log walls. Here he is holding a "T" shaped spline that goes on each side of the windows and doors, set into the slot in the logs so that they can slide by the window frame as they settle and compress. Note the memory foam to keep a seal on both the inside and outside while this is happening. You can see the colour of the stained outside wall and the unstained inside wall in this shot.
Sunday, November 9, 2008
View of the windows and doors in the basement entry
At November 4 this shot shows the windows and doors in the gables and gable ends as well as in the basement entry on the west side. Great work by Don's crew getting those in. Also thanks to Elaine for her help in sanding down the west side of the logs and more views of Bob's staining handiwork. From this view the many loads of fill positioned by JI Enterprises (Joseph's guys) is visible - over 500 loads of fill. John Roy has done lots of backhoe work but he's hard to catch on camera....
South side shingling
North side done to past the gable peak
North side shingling
Armour Guard on the roof
Angara is taking shape as a house. The pine facia is on and staining of the logs and facia is underway. Special kudos to Chris for doing the eve extender and high end log staining. The roof is clad with plywood and the front arch is filled in and shaped. Armour Guard (ice guard) membrane is covering the whole roof and starter shingling was laid out by Don Chris and Jim for the brothers and friends crew to work on November 1 and 2. Don, Chris and Jim were incredibly generous with their help and guidance for the set up and first "brothers and friends" day.
Roof trusses
Reassembly is done!
August 22 and reassembly is done. This includes Ronn's final lag bolting and adjustments for the ridgepole alignment, which he did on August 21 after the crew and crane had left. The house, Angara, is far more majestic and grand than I had planned (solid and practical was my objective). Somehow she took on a life of her own and with Ronn's artistic hand, she has emerged rather like a phoenix rising. Thank you to everyone who has helped so far.
Master Logbuilders
View from atop the crane - over the lake
View from over the top
Looking down at the house from our perch on the CRANE, we are pinned in a man-box at the end of the jib. My estimate is that is about 123 feet of crane and jib combined. Ronn and I went up in the box together and I was terrified on the way up (the harness did not give me much comfort). Once we were up there Frank's gentle handling made it a great experience and the terror lessened a little. That said, I believe that there are still indentations in the man-box frame where my fingers were gripping it. Thanks to Frank for a very safe trip, my fears were not justified at all.
Find Frank
Cowgirl?
Locking the structure together
Tie together with perlin
Gable end going into place
Good thing there was not much wind at the end of day two when we flew this baby in. I had not anticipated how much of a "sail" the gable end sections were. Once again Frank's exceptional handling with the crane makes this a smooth operation. We use tag lines on either side plus the wood plank guides to set the gable end into place.
Front porch eyebrow log
Here is a special arch shaped log to form the eyebrow for the south side porch roof. This proved to be challenging to incorporate into the roof but is a good idea to ensure that rain and snow are shed away from the door and so that snow does not accumulate there between the two south facing gables. This was Ronn's design concept and it really adds to the character of the house.
Positioning the king truss
King truss goes into position
Frank restingll
Porch header assembly
Positioning the king truss support column
Flying in the king truss support column
The king truss support column is flown in with "arms" intact. We all resisted the engineer's view that this column was required, but having to keep moving with the schedule we accepted the idea. In order to make it more palatable, Ronn selected a log with lots of character (the arms). This way we could all live with the requirement. Note from Catherine - the answer is NO, the arms will not be used to hang moose and deer carcasses in hunting season....
Flying the king truss out
Ronn positioning logs
Start of day two of reassembly
Locking in the "island" wall sections
Ronn and Ken in action
Ken's done unloading trucks for now and is working with Ronn on positioning logs. Ken is a very talented logbuilder and has a terrific ability to work out problems and calculations in his head, plus he's really good at working in high spots. Ken was also very patient about explaining the process when I badgered him with questions all day long.
Frank in action
Frank has to be the most talented crane operator that I've seen. When he says that you are as safe in his hands as being in your mother's arms - he's absolutely correct. Frank seems to know where you want a log positioned even before you know AND even if he is out of direct visual contact with you. Frank has other talents too which you'll see as the project continues.
Bob takes a break from slugging logs
East wall takes shape
Scott positioning logs
More truck unloading
Formula for success and harmony
Subscribe to:
Posts (Atom)